Geofence
The Geofence dialog lets you create geofence around your mission trajectories.
| The geofence is uploaded to the drones together with your mission. Do not forget to upload your mission again if you changed any of your geofence settings! |
Geofence action
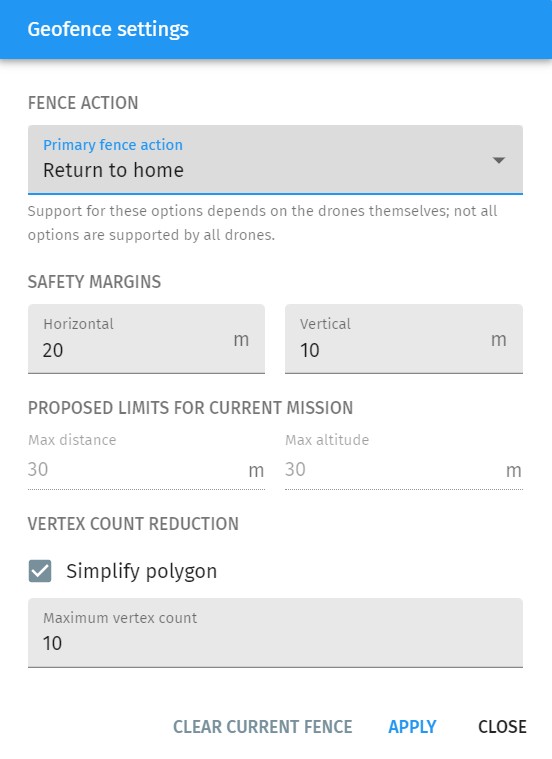
You can define the primary action when a drone hits the geofence. Possible options are:
-
Keep current action: do not change the current settings of your drone
-
Report only: only send a warning message from the drone to Skybrush when the geofence is breached, but do not take any specific action besides not letting the drone travelling further
-
Return to home: when the geofence is breached, return to home position
-
Land: when the geofence is breached, land immediately
| Not all drone types support all action types. The list of options was designed to support all possibilities of ArduCopter based drones. |
Safety margins
The geofence is a polygon that can be created/edited manually or Skybrush can generate it for you automatically. In the latter case you simply have to setup a convenient value for horizontal and vertical safety margin. These values will be used then by Skybrush around the common convex hull of all mission trajectories when the geofence is created.
Proposed limits for current mission
Besides the polygonal geofence, a distance based geofence is also created both horizontally and vertically if the firmware of your drone supports that (ArduCopter does support this). The automatically calculated limits of these distance based geofences for the actual mission are shown as read-only parameters based on the given safety margins.
Geofence polygon
This section contains additional settings related to the geofence polygon generation:
-
Enable the Generate automatically checkbox to update the geofence polygon automatically
-
The convex hull of the mission trajectories and thus the automatically generated geofence can be a very complex polygon with a large number of vertices. Press the Simplify geometry checkbox to enable automatic polygon simplification, which maintains safety margins but approximates the geofence with equal or less corners as the number given in the "Maximum vertex count" field.
Geofence generation and manual editing
If you press Apply, the geofence appears on the map by default as a thick red dotted polygon around your show convex hull.
After creation, the geofence polygon can also be edited manually on the map (its vertices can be moved around with the standard feature edit tools).
You can also create your own manual polygonal geofence with the tools available on the Map panel. In this case do not forget to set it as the geofence in its properties dialog (e.g. right click on the map, press "Use as geofence").
If you press the Clear current fence button, the currently active geofence will be deleted.
| Be careful not to use this button with your precisely created manual geofence as it cannot be recovered after this button is pressed. |