Adapt show to venue
| This dialog is experimental! Layout and functionality might change without notice. |
The Adapt show to venue dialog allows you to modify your drone show layout directly from Live, adapting it to the specific requirements of your venue. This tool relieves show designers from the burden of managing complex takeoff and landing segments of the show, while also enables onsite operators to make specific, last-minute adjustments on the spot in a simple, efficient, and parameterized way.
Use cases
The tool is typically used in the following use cases:
-
You need a new takeoff arrangement on a specific venue, different from what has been designed in your show
-
You need to raise the takeoff altitude due to e.g. unexpectedly large trees that need to be avoided when heading towards the first formation
-
Your takeoff grid is fixed, but you need to move or rotate the net show content relative to the takeoff grid slightly for better visibility for the audience
-
You have not designed takeoff and landing phases for your drone show at all and want to generate it automatically on the spot easily.
Basic usage
The Adapt show to venue dialog is available to Pro users only. It can be opened from the Show control panel as a unique optional step in the show control setup process.
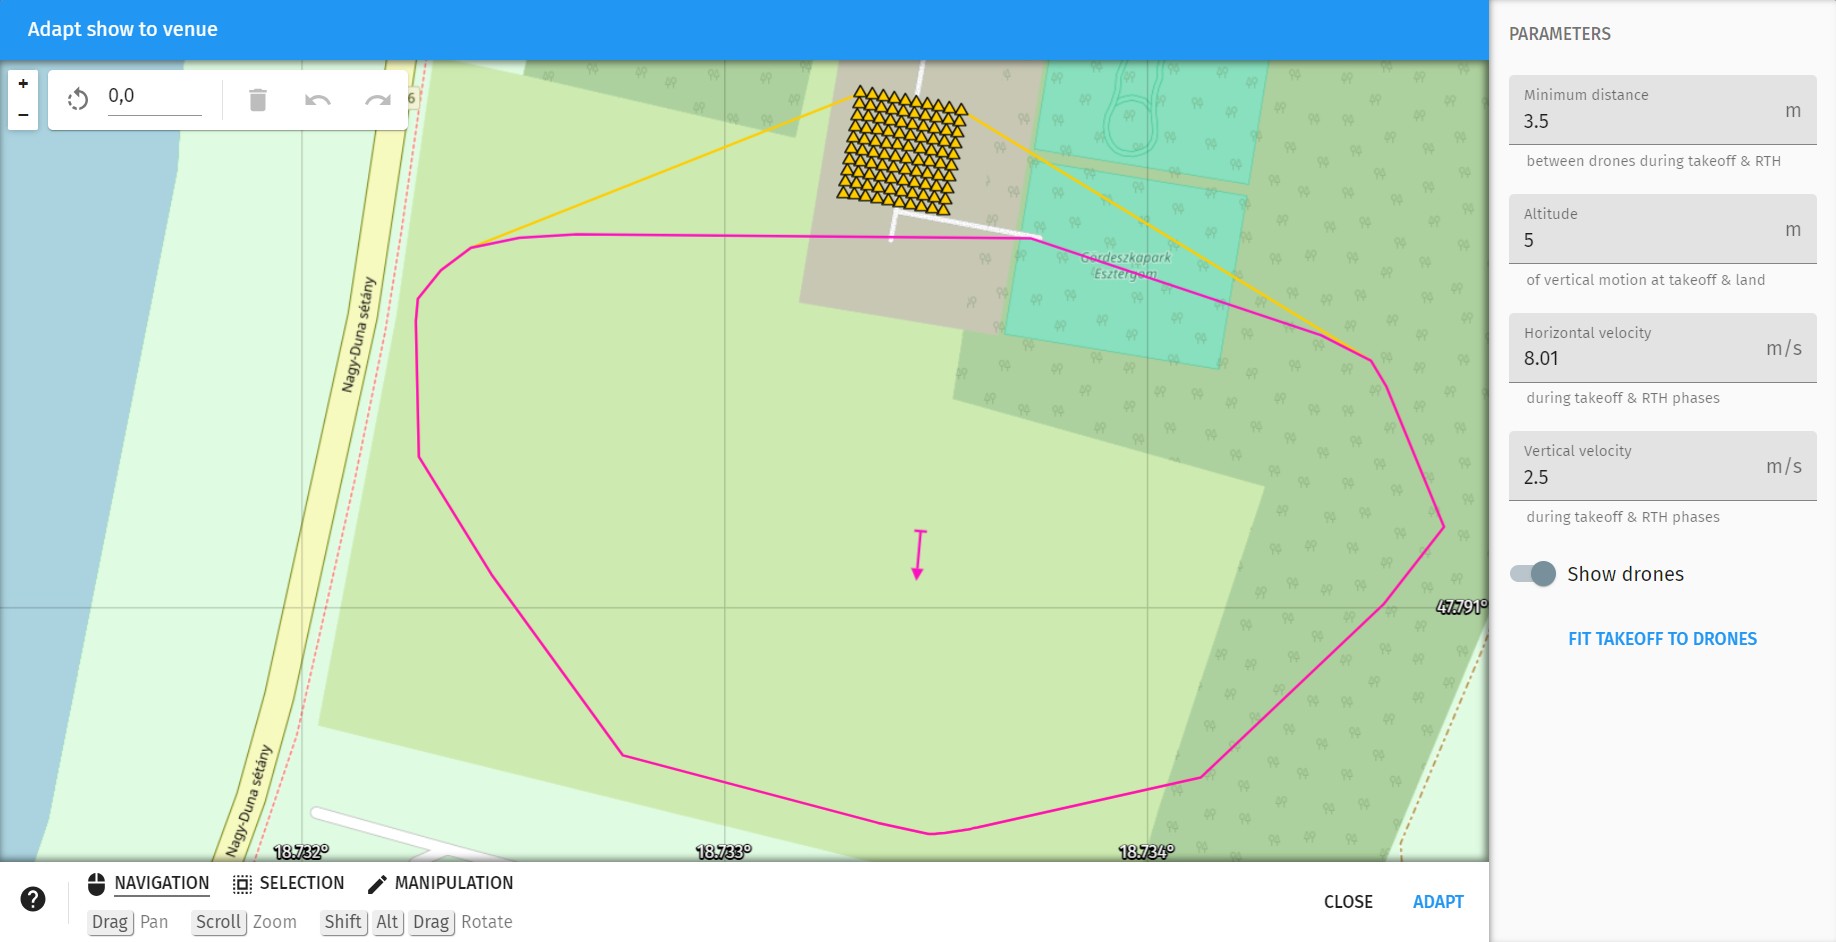
The dialog contains a map very similar to the default Map panel view, but with simplified layout. Features and drones are read-only here to avoid selection interference with show modifications. Individual trajectories are not shown at all. There are three main items that can be selected and manipulated in this dialog:
-
individual takeoff positions (yellow triangles)
-
the convex hull of the gross show, from takeoff to land (yellow outline)
-
the convex hull of the net show, without the takeoff and RTH+land phases, which are to be regenerated anyways here (purple outline)
The process of last-minute show redesigns is as follows:
-
You can select, move and rotate one or more of the mentioned three features (takeoff positions, net and gross show convex hull) together or individually according to your needs.
-
When done, setup trajectory parameters on the right side according to your drone hardware’s flight envelope and the restrictions of your venue, and light parameters according your show preference.
-
Press the ADAPT button on the bottom and wait a couple of seconds until the takeoff and RTH+land phases of your show gets regenerated automatically. When done, you will be notified how much the length of the takeoff and RTH phases changed:
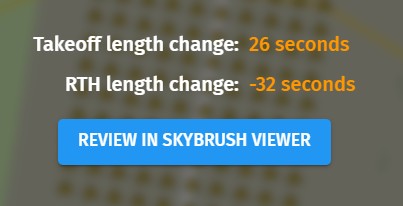
Not that this is crucial information as it modifies your expected start time relative to other show elements such as music, and also modifies the overall flight time. Review the results carefully!
-
Upon success, verify your new show using Skybrush Viewer thoroughly and check whether your safety thresholds are properly met and your show looks like you imagined.
-
If not satisfied, press the BACK button and try again with different settings. If done, press the SAVE button to save your new show into a brand new
.skycfile and after saving press the APPROVE button to close the dialog and load the new show automatically into the main layout of Skybrush Live.
Parameters
Show adaptation is a fully parametric design process with many user configurable options. The parameters exposed currently on the dialog are listed below in two categories, related to trajectories and lights.
Trajectories
Trajectory parameters alter the way drones move in the adapted takeoff and RTH phases.
- Minimum distance
-
This is the minimum distance you require between neighbouring drones at all times during the takeoff phase, the transition towards the first net show formation and the overall smart RTH procedure. The value cannot be smaller than the minimum distance in your first and last net show formation.
Layers of the takeoff grid are generated automatically based on this parameter. Higher values might result in too many layers.
- Altitude
-
The altitude of the lowest takeoff layer, in other words, the altitude below which there wont be any horizontal motion above the takeoff area. Setup this value according to the highest objects around your takeoff area as drones will start to move towards your first formation and come back after the last formation above this altitude.
- Horizontal velocity
-
Set this parameter to a convenient value your drones can tolerate to transition from the floating grid above the takeoff area towards the first formation in the show, and back during smart RTH after the show.
- Vertical velocity
-
This parameter defines the vertical speed of the takeoff and land phases and the maximum tolerable vertical speed of the transitions around the net show.
- Takeoff duration
-
If nonzero, this parameter sets an explicitely defined length of the takeoff phase until the net show start. If the requested value is smaller than the minimum value needed for the takeoff transformation, the show adaptation procedure will fail. If it is longer, drones will hover in the air after the takeoff with black color at the place of the first formation until the start of the net show.
Lights
Light parameters alter the coloring of the drones during the adapted takeoff and RTH phases.
The Light effect dropdown lets you choose between different light effect types to be applied to both the adapted takeoff and RTH phases. Each light effect type might have additional parameters that appear below the dropdown selection. Currently available light effect types are summarized below.
- Off
-
This light effect turns all lights off during the adapted takeoff and RTH phases, except for a purple takeoff warning light right before takeoff.
- Default
-
This is a default integrated coloring scheme, that colors drones according to their takeoff layers in the adapted takeoff phase and turns them yellow during the adapted RTH phase. A single Brightness parameter defines the overall brightness of all colors used.
- Solid
-
This light effect adds a solit RGB color to both the adapted takeoff and RTH phases. The color can be chosen with the color picker right under the Light effect dropdown.
- Sparks
-
This light effect adds random white sparks to the adapted takeoff and RTH phases. The overall density of the sparks can be tuned with the off_duration parameter that defines the mean duration of the random statistics of the black periods between white flashes, in seconds.
Additional features
The following extra features are also available on the dialog to help your process:
- Zoom in/out
-
Buttons similar to the main map with which you can zoom your basic map layout
- Rotate map
-
Buttons similar to the main map with which you can rotate the map as you need
- Undo/redo
-
Use the special undo/redo buttons on the top of the dialog to manipulate features on this dialog with more confidence and speed.
- Help
-
Move your mouse of the ? icon for a quick guide on dialog usage.
- Help toolbar
-
Check hotkeys and mouse movements for navigation, selection and manipulation quickly to speed up your learning curve on this dialog.
- Show drones
-
Enable this checkbox to show all your drones on the map layout for reference. Disable them if they are disturbing on the screen.
- Fit takeoff to drones
-
Press this button to move your required takeoff positions to the current exact position of your drones. This tool basically lets you go out to a field, throw out your drones anywhere from where you wish to takeoff and redesign your show on the spot to takeoff and land from and to your custom locations.
| Use this tool only with good quality RTK positioning, otherwise your takeoff positions will be noisy. |
| For the show adapt tool to work well, make sure your net show segment of the show starts and ends with stationary (hovering) drones. If you cut the show at points where drones possess substantial speed, your end results might violate minimum distance requirements around these moments or result in larger momentary drift on your real drones when they need to suddenly change directions between the original show trajectory and the new takeoff/rth segment. |