Light Effects panel
The Light Effects panel lets you create advanced light effects that are applied on top of your base color animation dynamically.
Light effects are parametrized and they are not baked in as color keyframes, so it is very easy to adjust them if the timing of the animation changes — you only need to adjust the start frame and the duration of the light effect. However, this means that Blender calculates the light effects on-the-fly when you change frames, thus it comes with a slight performance cost.
Anatomy of a light effect
Every light effect builds on a user-defined color space: a one dimensional color ramp, a two dimensional color image or a custom function:
- Color ramp
-
Color ramps consist of an arbitrary number of color stops at arbitrary positions, and a given interpolation method between the defined color stops. Essentially, the color ramp is a function that takes a number between 0 and 1 and returns a color.
- Color image
-
Color images are two dimensional analogues of color ramps with discrete colors stored in an image. Color images are basically two dimensional functions: they take two numbers between 0 and 1 (along their normalized X and Y axes) and return a color.
- Custom function
-
A Python function called for every drone at every frame of the light effect. The function should return a color, a tuple of four numbers ranging between 0 and 1 (red, green, blue and alpha components).
The light effect that you define in the panel produces one or two numbers between 0 and 1 for each drone, based on selected output mapping functions. The color ramp turns the first, the color image turns both mapped numbers into the color that gets applied to the drone.
Colors on the color ramp may have an alpha component. When the alpha component is 1, the color is opaque — it will replace the original color of the drone. When the alpha component is 0, the color is completely transparent and the original color of the drone will not be modified. Values in between 0 and 1 produce transparency effects — for instance, an alpha component of 0.5 mixes the original color of the drone with the color from the color ramp in equal proportions.
Light effects may be (and usually are) limited in space and time. Time-wise, the light effect affects the drones only from its designated start frame through its end frame. Space-wise, the light effect may affect all drones or only a subset of drones that are within the boundaries of an associated mesh. The mesh may be animated to produce dynamic light effects; for instance, you can "sweep" a cone of light on the drones by creating a light effect that sets the color of the drones to white, and then limiting it to the interior of an invisible sphere that is then swept through the scene.
The light effect stack
You may have noticed that the upper part of the light effects panel is occupied by a list. This list contains the effects themselves. In each frame all the effects are processed in a top-down manner, and for each effect, Blender decides whether the effect is going to affect the current frame or not, depending on its temporal and spatial properties. In any given frame, multiple effects may be active, and in this case the original color of each drone (defined by the keyframes of its material) is modified by each active effect in the order defined by the list of effects. This becomes important when the colors of the effects have alpha channels as the output may be a mixture of the original color of the drone as well as one or more active effects.
Importing and exporting light effects
Use the Import… button to import parametric light effects prepared in another Blender file, and use the Export… button to export one or more light effects of a given Blender file for later use (you can export the currently selected, all enabled or all light effects based on your choice of preference).
Please note that when a light effect is imported or exported, the data structures associated with the light effect (object meshes, images etc.) are not exported/imported, only a reference to their names is used. If you want to restore the same effect in another file, you need to have the same objects/images present in that Blender file as well.
Creating, removing, reordering light effects
Use the + button next to the light effect list to add a new light effect to the end of the list. You can remove effects from the list by pressing the - button. You can duplicate previously created light effects with the Duplicate Light Effect button. To rearrange light effects, use the ▲ and ▼ buttons.
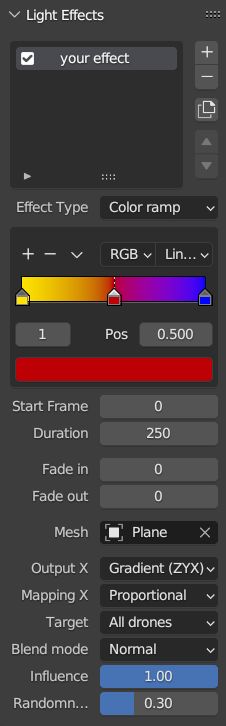
The color ramp
Use the Effect Type dropdown list to select a light effect based on a color ramp (this is the default setting). In this case, below the list of light effects there are standard Blender widgets to set up the color ramp associated to the currently selected effect in the light effect stack. These widgets work just like any other color ramp editor in Blender, but here is a short summary for sake of completeness:
-
The + button below the light effect list adds a new color stop to the color ramp.
-
The - button below the light effect list removes the selected color stop from the color ramp.
-
The v button reveals additional, less common (but nevertheless very useful) operators that can be applied to the entire color ramp:
-
Flip Color Ramp
-
Distribute Color Stops from Left
-
Distribute Color Stops evenly
-
Eyedropper tool for color selection
-
Reset Color Ramp
-
-
The "Color mode" dropdown list selects the color space in which the interpolation of the color ramp takes place. You can choose between RGB (red, green, blue), HSV (hue, saturation, value) and HSL (hue, saturation, lightness) color spaces.
-
The "Interpolation" dropdown list selects the interpolation mode used for the color ramp.
Refer to the documentation of the Color ramp widget in Blender’s own documentation for more details.
The color image
Use the Effect Type dropdown list to select a light effect based on a color image. In this case an image selector input field appears where you can select the image used for the light effect. Further below a secondary output type selector and an optional output mapping selector also appears to be able to take advantage of both dimensions of the image as parametric input.
The most trivial usage of a color image is where e.g. the X axis represents time (TEMPORAL output type) and all pixel columns along the Y axis at a given X represent "discrete color ramps" for different time instants (e.g. using the 'INDEXED_BY_FORMATION' output type). This way color effect design is reduced back to simple color image design that can be performed with any external tool.
Another usage is to project a static image onto the drones in a grid formation, using the properly selected Gradient (…) axis assignments on both axis.
Note that there is no interpolation between pixels in the color image, they are selected for each drone and each frame discretely. Therefore, color images should be used with a width/height that correspond to the selected output mapping perfectly (e.g. same height as the number of drones, same width as the number of frames in the light effect etc.), or they are suggested to be smooth images without sharp edges to compensate for the rounding errors of the discrete mapping. You can also scale up a low-resolution image in an external image editor tool and use the scaled-up version to simulate interpolation.
| Directly accessing the pixel data of an image in Blender is somewhat slow at the moment (Blender 4.2 LTS). To improve the frame rate when using lots of light effects, we cache the retrieved pixels of images corresponding to a light effect. The cache is invalidated when a new image is selected for the light effect or when the light effect is removed, but not when you change the image data directly (e.g., via Blender’s Python API). If this happens, you can force a cache invalidation by selecting a new image for the light effect and then selecting the original one again. In most workflows this should not be a problem. |
The custom function
Use the Effect Type dropdown list to select a light effect based on a custom function. In this case a file can be selected that contains the Python function that will be used as the custom function for the light effect. The file should contain a Python function with the following named arguments:
def color_function(frame, time_fraction, drone_index, formation_index, position, drone_count):
    return (1.0, 1.0, 1.0, 1.0)
Temporal constraints
The next group of properties below the color ramp or color image specify the temporal constraints of the light effect, i.e. when the light effect should be applied.
- Start, duration, end
-
The Start frame, Duration and End frame properties define the hard temporal limits: the light effect will be completely inactive outside this time interval.
| Press the ◀ buttons on the right side of the start and end frame boxes to set them to the current frame. |
- Attach to storyboard entry or transition
-
You can also attach the start and end frames of a light effect to a storyboard entry or transition by selecting the proper entry or transition from the Attach to dropdown. If you do so, your start and end frames (and duration) will be kept in synchrony with your selected entry at all times.
| To add an offset to the start or end frames of your light effect relative to the attached storyboard entry start and end times, simply change the start and end times of the light effect while a storyboard entry is attached. You will see the frame offsets next to the start and end frame indicators in brackets (e.g. (+1) or (-5)). |
- Fade in, fade out
-
The Fade in and Fade out properties specify the duration of the fade-in and the fade-out periods at the beginning and the end of the time interval of the light effect. During the fade-in period, the intensity of the light effect grows gradually from zero (inactive) to 1 (fully active). Similarly, the fade-out period animates the intensity of the light effect from 1 (fully active) to 0 (inactive). You can turn both of these off by setting their duration to zero.
Spatial constraints
Light effects may also be limited in space such that it affects only a subset of the drones. This is achieved by selecting a mesh in the Mesh picker widget and then setting the Target dropdown to one of the following options (instead of "All drones", which does not create a spatial constraint):
- Inside the mesh
-
Blender will test in each frame which drones are inside the selected mesh, and the effect will be applied only to those that are inisde. Note that containment checks are a relatively expensive operation, especially for complex meshes.
- Front side of plane
-
This setting is suitable if your mesh is a plane. Imagine that the plane is infinite and it separates the space into a "front" and a "back" half. Blender will select those drones that are in the "front" half of the 3D space. If your mesh is not a plane, Blender will pick the first face of the mesh and extend that into infinity. This test is computationally less expensive than a full containment test, so for simple cases you should use this instead of the more expensive containment test that you can achieve with the Inside the mesh option.
The result of the spatial constraint can also be inverted with the Invert target checkbox. This is mostly useful in conjunction with the Inside the mesh option, allowing you to match only those drones that are outside the associated mesh instead of being inside.
Output modes
The Output X and Output Y dropdowns determine how the color of a drone is picked from the color ramp or color image. Recall that each light effect essentially produces one or two numbers between 0 and 1 for each drone, and then passes this number through the color ramp or color image to calculate the final color that the effect will apply on the drone. The output dropdowns provide options for picking this number:
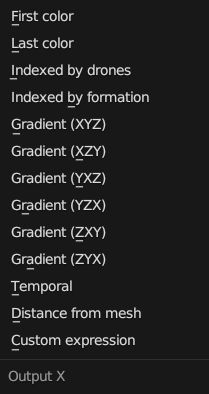
- First color of color ramp
-
The first color of the color ramp will be used by all drones during the whole light effect; in other words, each drone picks 0, which represents the start of the color ramp.
- Last color of color ramp
-
The last color of the color ramp will be used by all drones during the whole light effect; in other words, each drone picks 1, which represents the end of the color ramp.
- Indexed by drones
-
All the drones are sorted according to the order they appear in the
Dronescollection, and they are then distributed evenly along the color ramp or color image. For instance, if you have five drones, the first drone gets 0 (the left edge of the ramp), the second drone gets 0.25 (25% between the left and the right edge of the ramp), the third drone gets 0.5 (50% between the left and the right edge) and so on. - Indexed by formation
-
All the drones are sorted according to the order they get mapped to the formation of a given frame, in the order markers appear in the corresponding subcollection in the
Formationscollection. - Gradient (XYZ, XZY, …)
-
Drones are sorted according to their coordinates along the X, Y and Z axes (in this order), and they are then distribued evenly along the color ramp. This option has six variants with different axis order.
- Temporal
-
All drones will cycle through the color ramp simultaneously throughout the total duration of the light effect, starting from the left and ending at the right edge.
- Distance from mesh
-
The single static color picked for each drone will be calculated by mapping the normalized distances between the drones and the selected mesh (see the Mesh widget) to the color ramp (i.e. the closest drone to the mesh will pick the leftmost color in the ramp, the farthest will pick the rightmost color, all the rest will get a value in between, distributed evenly along the color ramp).
- Custom expression
-
A Python function which returns a number between 0 and 1. The function is called for each drone and each frame of the light effect. EXAMPLE:
def odd_even(frame, time_fraction, drone_index, formation_index, position, drone_count):
    return drone_index % 2
Mapping
Some output mode types (such as Distance from mesh and Gradient-based types) support two mapping modes between the drones and the color ramp:
- Ordered
-
In ordered mode, drones are sorted first based on their coordinates or distances, and then they are distributed evenly along the color ramp or image.
- Proportional
-
In proportional mode, the drones are distributed along the color ramp or image in a way that their distances on the color space are proportional to their distances or coordinates in the scene itself.
Influence
The Influence parameter sets the overall transparency of the light effect. 1 means that the light effect completely overwrites the base color animation, 0 means no effect at all.
| The influence parameter can be animated with keyframes, which is a simple way to create flashes, for example. |
Randomness
The Randomness parameter can be used to add a bit of randomness to the numbers picked by the drones according to the Output dropdowns. Each drone is associated with a unique random number between -0.5 and 0.5, this number is multiplied by the randomness parameter, wrapping around the edges of the color ramp or image as needed, and the result is added to the number that was calculated based on the setting of the Output dropdowns. This final number is then used to pick the color of the drone from the color ramp or image. Note that the default value of the randomness parameter is zero, which means that the value derived from the Output settings is used as is.