Software installation
Skybrush Studio for Blender is a platform independent tool, just like Blender. The installation procedure is the same for Linux, macOS and Windows. Please follow the steps below.
Installation
1. Check hardware requirements
We suggest to follow the official Blender recommendation for choosing your computer on which you want to run Blender and Skybrush Studio for Blender.
An additional requirement is that you need to have active Internet connection on your computer as Skybrush Studio needs to communicate with the Skybrush Studio Server for certain tasks such as planning transitions or creating exports in Skybrush compiled show format. You may use the software without Internet connection, but certain functions that require an Internet connection will not be available until you go online again.
2. Install Blender
There are many Blender versions out there, we aim for compatibility with the latest Long Term Support (LTS) release. This is version 4.5 at the time of writing. if you are unsure, check the version number of the latest Long Term Support (LTS) release on the Blender site.
3. Install Skybrush Studio for Blender
Skybrush Studio for Blender can be downloaded from https://skybrush.io as a single .zip file. Please download it to your computer first, then follow the instructions below.
Safari on macOS automatically unzips all .zip files by default, which will prevent you from selecting the .zip file itself when installing the plugin. If you are using Safari on macOS, hold down the Option key when clicking on the download link to prevent this from happening, or turn off the unzipping of "safe" files permanently in .
|
-
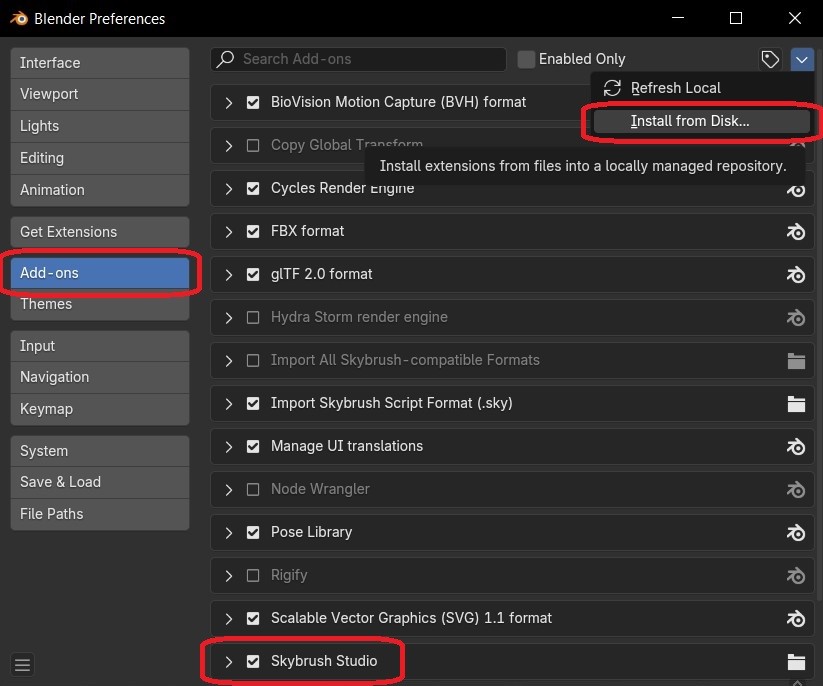
Open Blender and go to Edit → Preferences → Add-ons.
-
Select Install from Disk… from the dropdown menu in the top right corner.
-
In the popup window select the Skybrush Studio for Blender
.zipfile that you have downloaded previously to your computer, and press Enter. -
Once installed, activate the "Skybrush Studio" add-on by clicking on the checkbox next to this item in the add-on list (you may need to scroll down to find the "Skybrush Studio" item).
-
Setup add-on preferences by pressing the > button on the left side of the "Skybrush Studio" add-on item. Note that generally you need to change settings only if you are using a version of Skybrush Studio for Blender other than the free community edition:
- API key
-
If you have received an API key for communicating with the Skybrush Studio server, paste it here (by default you do not have to touch this setting).
- Server URL
-
Enter the URL of a dedicated Skybrush Studio Server if you are using a dedicated server (by default you do not have to touch this setting, change only if you know what you are doing).
- Use local server
-
Press this button if you have purchased a professional local copy of Skybrush Studio Server that is running on your own machine. This action will fill the Server URL field automatically.
- Use community server
-
Press this button to use the online community server. This action will clear the Server URL field automatically. Our community server is a free service but it might be limited in drone number, execution time or available features. Purchase a professional server from Skybrush Store if you need to use Skybrush Studio for Blender without limits.
- Enable experimental features
-
Enable this checkbox if you are open to experiment with the latest features of Skybrush Studio for Blender.
4. Enable Online Access in Blender
Starting from Blender 4.2, the preferences dialog in Blender provides an option where the user can explicitly indicate that they wish to allow (or deny) access to online resources. Skybrush Studio for Blender uses an online resource (either a community server or a locally hosted instance of that server) to calculate transitions, decompose formations, plan takeoffs and landings and export the show into various file formats. If you want to use the full capabilities of the add-on, you need to enable online access if you are running Blender 4.2 or later. Earlier versions of Blender are not affected.
To turn on online access, open Blender and go to Edit → Preferences → System, scroll down to the "Network" section and then tick the "Allow Online Access" checkbox.
5. Setup network timeout in Blender
If you use large fleets and/or long and fine-grained shows, make sure that the "Network timeout" setting right below the "Allow Online Access" checkbox is large enough to handle your requests towards your local Skybrush Studio Server or towards the online community server.
The longest action is usually the show export. During export most time is taken by the sampling of your show within Blender to form the input of the requests towards Skybrush Studio Server. Even though this procedure is not part of the request time, with large shows you may run into cases where you do need more processing time than the default 10 seconds. If such timeout occurs, raise the value as convenient.
6. Install Skybrush Studio Server
6.1 Cloud server for community users
If you are a community user, you do not need to install the Skybrush Studio Server as you can rely on our cloud-based community server.
6.2 Local server for pro users
After purchasing a professional license for Skybrush Studio for Blender, follow the steps below for proper installation:
-
Download a precompiled copy of Skybrush Studio Server from your Skybrush Account.
-
Run your server instance to get the hardware ID of your machine. It will be displayed in the terminal log of the server.
-
Use this hardware ID for activating your license in the Skybrush Store.
-
Download your license file named
skybrush-studio-server.cmland copy it to the folder where you installed the server itself (If you cannot determine this path, run the server and it will display the expected location of the license file). You might need system administrator privileges to write into this folder.
The terminal log of Skybrush Studio Server will give you instant feedback about the presence and content of your currently used license file upon execution of the server.
| If you wish to use your new local server, do not forget to press the Use local server button in the "Skybrush Studio" add-on preferences (to open preferences, press > on the left from the "Skybrush Studio" add-on item). |
Installing updates
Skybrush Studio for Blender consists of multiple modules that are interpreted by the Python interpreter built into Blender. In order to perform an upgrade of the add-on, the previous version needs to be unloaded completely before the new version is installed. Due to how Python’s module system works, this is very hard to do without unloading the plugin manually. Therefore, the preferred sequence to update the add-on is as follows:
-
Deactivate the add-on in Edit → Preferences → Add-ons by unticking the checkbox in front of the Skybrush Studio add-on.
-
Install the new version of the add-on using the same procedure as outlined above.
-
Exit Blender.
-
Restart Blender.
-
Activate the add-on again in Edit → Preferences → Add-ons.
| If the update still fails after following the steps outlined above, try to completely uninstall the old add-on first manually (as described below) and then re-install the new one from scratch. |
Uninstallation
If you decide to uninstall Skybrush Studio for Blender for any reasons, you have to do it manually. Removing the add-on from Blender’s add-on manager is possible, but it will not remove all files related to Skybrush Studio for Blender. The full, manual process is as follows:
-
Deactivate the add-on first in Blender’s add-on manager.
-
Open the file manager of your operating system and navigate to the folder containing the Blender add-ons. Refer to Blender’s documentation to find the add-ons folder.
-
Remove the file named
ui_skybrush_studio.py. -
Also remove the
skybrushfolder within thevendorfolder.