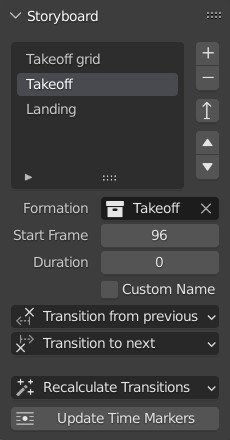
Storyboard panel
The storyboard specifies the overall structure of your drone show. It consists of entries, where each entry contains a reference to a formation as well as a start frame and a duration. The location constraints added by Blender will ensure that each drone reaches one of the markers in the formation by the time the show reaches the start frame, and that the drone keeps on following its marker for the entire duration of the formation.
Creating a new storyboard entry
Press the + button next to the formation list in the Storyboard panel to add a new entry to the end of the storyboard. The new entry will not refer to any particular formation so make sure you also pick the formation in the editor below the storyboard entry list after adding the entry.
Editing a storyboard entry
Each storyboard entry has a label and an associated set of properties that define the timing and the transition corresponding to the storyboard entry. The label of the formation can be edited by double-clicking on the storyboard entry in the entry list. The widgets below the storyboard entry list allow you to edit the properties of the currently selected storyboard entry.
- Formation
-
Shows or sets the formation corresponding to the selected storyboard entry.
- Start Frame
-
Shows or sets the frame when the formation of the selected storyboard entry should appear on the sky in the drone show.
Press the ◀ button on the right to set the start frame to the current frame. - Duration
-
Sets the duration of the selected storyboard entry in the drone show. The end frame of the formation will be the sum of the start frame and the duration, inclusive (i.e. the end frame is part of the formation). Each entry must have a duration of at least one frame.
- End Frame
-
Shows or sets the end frame of the formation. Adjusts the duration behind the scenes.
Press the ◀ button on the right to set the end frame to the current frame. - Purpose
-
Shows or sets the purpose of the given formation. The purpose can be "Takeoff", "Show", "Land" or left "Unspecified". The purpose of a given formation is automatically inferred from the operation you use to create the formation. In practise you usually do not need to modify it manually unless you know what you are doing. The purpose annotation gets written into the .skyc file as a hard requirement for the show adaptation tool in Skybrush Live. If you perform onsite show adaptation, only formations marked with the "Show" purpose will be kept from the show, the rest (takeoff and land) will be replaced on the spot based on your actual environment and needs.
- Custom Name
-
Ticking this check box allows you to keep the label of the storyboard entry even if you change the associated formation. Unticking this will change the label of the storyboard entry to the name of the formation when you change the formation.
- Transition from previous
-
Shows or sets the type of transition between the previous formation and this one. The default is
Auto, which enables Skybrush Studio to find an optimal mapping between the markers of the initial and the target formation. If you want to maintain the mapping yourself, set it toManualinstead and then sort the markers of the formation in the Outliner such that they are in the desired order (note that you need to turn off alphabetic ordering in the Outliner first). Blender will then map the nth marker in the initial formation to the nth marker in the target formation.You can also select between two fundamental temporal schedules for the transition:
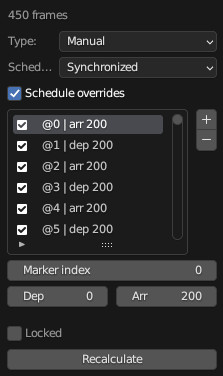
SynchronizedandStaggered. InSynchronizedmode all drones depart from and arrive to the formations at the same time. InStaggeredmode drones depart and arrive at different times, with a specific delay value between each of them set by the Departure delay and Arrival delay parameters (see image below).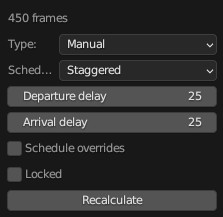
as an alternative to layered takeoff, you can use a staggered transition for your takeoff as well. If you do so, make sure to use the Ensure safety distancereordering operator for the takeoff formation.If you enable the Schedule overrides checkbox, the departure and arrival times of individual markers in the formation can be altered. This option is useful if an automatic transition violates your minimal distance rule. In this case adding a bit of delay to a conflicting drone manually might eliminate the danger. Note that the automatic layered takeoff and landing operations also set individual schedule overrides behind the scenes.
Finally, enable the Locked checkbox to lock a transition and do not allow its automatic update when the Recalculate transitions button is pressed.
Once you are satisfied with all the parameters of the transition, press the Recalculate button on the popup window to update your show with the current transition.
- Transition to next
-
Shows or sets the type of transition between this formation and the next one. Parameters are identical to those of the Transition from previous option, see more details there.
Removing a storyboard entry
Press the - button next to the formation list in the Storyboard panel to remove the selected storyboard entry from the list.
Finding the storyboard entry for the current frame
Press the upward pointing thin arrow button next to the formation list in the Storyboard panel to select the storyboard entry that contains the current frame. If the current frame falls between storyboard entries, the next entry will be selected. Pressing this button clears the selection if the current frame is after the end of the storyboard.
Changing the order of formations
Press the ▲ button next to the formation list in the storyboard to move the selected entry up by one slot in the storyboard. Similarly, the ▼ button next to the formation list moves the selected entry down by one slot in the storyboard. Skybrush Studio will automatically adjust the start times of the entries to ensure that they are in ascending order.
| It is possible to mess up the order of entries in the storyboard by changing the start times explicitly in a way that they are not in ascending order any more. Skybrush Studio will fix the ordering of the entries the next time the transitions are recalculated, or before any operation for which the add-on needs the exact ordering of entries. |
Recalculating transitions
Once you are satisfied with your storyboard, you can press the Recalculate Transitions button to create automatic and optimal transitions between your formations without collisions.
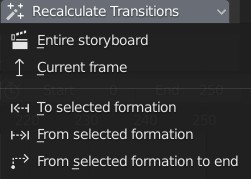
The popup menu that appears when clicking on the button offers various options to recalculate all transitions or only a subset of them. The recalculation process also creates or updates the constraints on your drones in your Drones collection to follow the given formations during their associated time interval.
Updating time markers from the storyboard
The main cues of the storyboard can be rendered as time markers that appear in the Timeline Editor. To reset all time markers related to Skybrush Studio and update them based on the current storyboard entries, press the Update Time Markers button at the bottom of the Storyboard panel (markers added manually will remain untouched).