Swarm Panel
The swarm panel helps you setup your drone show with all technical parts that are not the sole responsibility of the drone show designer by default, such as the initial positions, the takeoff, return-to-home or landing procedures.
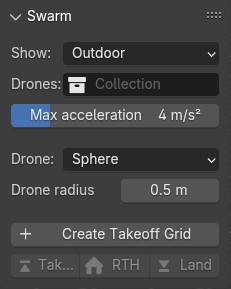
Show type
Please specify whether you designed a show for outdoor or indoor settings. This will help setup drone size, exporters and possibly other parameters adaptively.
Drone collection
Click on the Drones button to select the collection that is your primary source of your drone objects. By default you do not have to change this setting, the Create Takeoff Grid button below will create a "Drones" collection and set it as your primary source automatically.
| Any mesh that is placed in the collection selected here will be treated as a drone by Skybrush Studio, and it may adjust the constraints and other properties of the mesh as needed when performing certain operations. Make sure that there are no other objects in the collection that you select here, only the ones that you want to consider drones. |
Preferred acceleration
The Preferred acceleration button sets up a preferred acceleration (in all directions) that is used by the automated motion planning functions of Skybrush Studio, for example when automatic transitions or transition times are calculated.
Drone template
Before creating your first takeoff grid that initializes your drone objects, you can select a template object for your future drones. There are three options to select from, given by the Drone template drop down menu.

The default option is an isotropic Sphere. Select Cone to have a simple anisotropic object (suitable for yaw-controlled shows), or select Selected Object for any custom object that will be used as your drone template.
If Selected Object is chosen, make sure you have your template object selected before pressing the Create takeoff grid button. Note that this object will disappear after the creation of the swarm as it shall be used for the template only.
Drone radius
If you select a "Sphere" or "Cone" type drone template, you can also setup a radius for your template object before creating your first takeoff grid. Similarly to the Drone template option, this setting will also disappear after creating the takeoff grid.
If you wish to change your drone size at a later stage, you can use standard Blender tools for this. First select all your drone objects you wish to resize, then set the "Transform Pivot Point" to "Individual Origins" and the simply scale up all objects around their own origins with s.
Create Takeoff Grid
The Create Takeoff Grid button helps you set up your takeoff and landing grid. The takeoff and the landing grid is assumed to be the same by default, but you can change them later on if needed.
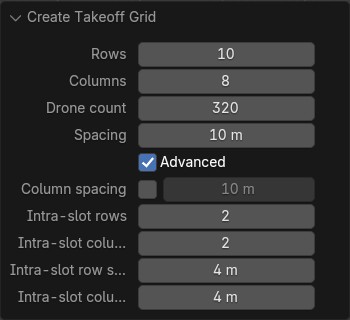
For a regular takeoff grid you can define the number of rows and columns, the exact number of drones and the spacing between them. Once you press OK, a rectangular grid is created with the specified parameters.
For advanced settings enable the Advanced checkbox.
If you wish to have a separate column and row spacing for your basic takeoff grid, enable the Use separate column spacing checkbox and setup a separate column spacing.
If you wish to takeoff (and land) in layers, you can also define a more complex takeoff grid with slots, where each slot contains more than one drone with typically, but not necessarily smaller spacing (see the Intra-slot parameters). With such a takeoff grid it will be guaranteed that only one drone will takeoff from (and land to) every slot at a time, using layered takeoff and land operations automatically.
The Create takeoff grid operator also creates all Skybrush-specific collections (Drones, Formations, Templates) that you will need for your drone show, it adds the first "Takeoff grid" entry to the storyboard and also initializes your drones in the 3D Viewport editor.
| Once the takeoff grid is created, you are free to modify the created "Takeoff grid" formation to re-arrange the placement of the drones using standard Blender operations, thus you can easily adapt the grid to the requirements of your specific takeoff area. For instance, if there are lampposts, stairs, power lines or any other obstacles in the area, you can move the affected drones to other positions by simply changing the takeoff positions in the "Takeoff grid" formation. |
Takeoff
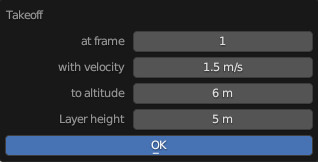
The Takeoff button adds a takeoff maneuver to a specified altitude and with a specified average vertical velocity from your initial takeoff grid. The start frame of the maneuver can be customized, although it is usually the same as the first frame of the scene.
If the minimum distance between drones in the takeoff grid is smaller than the given spacing parameter, the takeoff is automatically performed in layers with no drones closer to each other than the spacing.
In such cases (i.e., when you set a small spacing parameter or the takeoff grid was created with more than one drones per slot), use the layer height parameter to setup the altitude difference between additional target layers above the default layer during the layered takeoff operation.
This button should ideally be pressed right after the takeoff grid is created, but before any other formations are added. It is also possible to use the operator later after having defined the first few formations, but you must ensure that there is enough time before the first formation to perform the takeoff and get to the first formation in time.
| Skybrush requires you to specify the average vertical velocity of the drones during takeoff. This lets you gauge easily how much time the takeoff will need (e.g., taking off to 6 meters with an average velocity of 1.5 m/s takes 4 seconds), but since the drones need time to accelerate and decelerate, their maximum vertical velocity will be higher than the average velocity to compensate for the time lost during acceleration and deceleration. Make sure to take this into account in order not to overshoot the vertical velocity limits of the drones. |
Return to home (RTH)
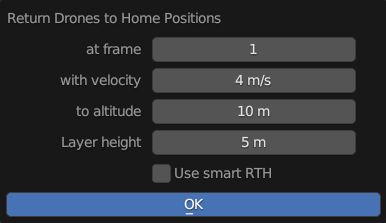
The RTH button performs a return-to-home maneuver with a specified average velocity from your last formation of the show. This procedure brings the drones straight above the positions where they are supposed to land to an altitude that can be specified in the operator.
If the minimum distance between drones in the takeoff grid is smaller than the given spacing parameter, the return to home operation is automatically performed in layers with no drones closer to each other than the spacing.
In such cases (i.e., when you set a small spacing parameter or the takeoff grid was created with more than one drones per slot), use the layer height parameter to setup the altitude difference between additional target layers above the default layer during the layered RTH operation.
Note that the maneuver is not performed at the specified altitude — it is initiated from the positions at the end of the last formation. However, all drones arrive to the given altitude (or layered altitude) value, above the takeoff grid.
This button should be pressed after all formations of the show are inserted to the storyboard, but before the landing entry is given.
| It is not guaranteed that each drone will land at the same position where it took off from. In the vast majority of cases, they will land at a different position in the grid. This is intentional; safe collision-free trajectories are easier and faster to design when the software is free to choose which drone should occupy which landing position. |
Smart return to home
If you intend to land each drone to its original home position, use the Use smart RTH checkbox. This is a pro feature that attempts to create a special trajectory for each drone from its latest location to its original home position, without collisions, using the given spacing as minimum distance in its planner.
If you use the smart RTH option, you do not need to land your drones afterwards, as the landing process is an integrated part of the smart RTH maneuver. For the same reason, the layer height parameter is also neglected in this case. The altitude parameter is used to specify an altitude threshold below which the drones are guaranteed not to move horizontally.
| it is not ensured that there is a smart RTH solution for each situation. If the planner fails to perform the operation, try reducing spacing parameter or change the RTH altitude setting. |
Land
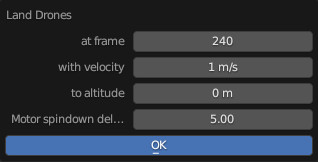
The Land button lands the drones, starting from a given frame such that they move downwards in a straight line from their current position until they reach the given target altitude (ground is assumed to be at Z = 0). As usual, the average velocity of the descent can be adjusted.
If the minimum distance between drones in the takeoff grid is smaller than the given spacing parameter, the land operation is automatically performed in layers with no drones closer to each other than the spacing.
In such cases (i.e., when you set a small spacing parameter or the takeoff grid was created with more than one drones per slot), use the Motor spindown delay parameter to setup the time difference between landing layers. This ensures that drones will land close to the others within the same slot only when the motors of the neighboring drones are already stopped.
This button should be pressed after the return to home entry is inserted to the storyboard.