Unit test system components in Skybrush Live
Before you fly with multiple drones in SHOW mode, you need to make sure all your drones and other system components work properly. Below we give you brief ideas what to check in Skybrush Live to assure that your system is ready for true missions
- Check flight mode
-
As a first test, you can try switching flight modes on your drone with your remote controller or with the
mode param1message, whereparam1should be replaced with the name of the flight mode required. The current flight mode is displayed in the UAVs panel in list mode in the gray rounded box between the general status indicator (e.g. "OK" or �PREARM�) and the battery charge indicator.

You should see the flight mode indicator responding to the mode switches that you perform. Make sure SHOW mode is available, along with any other flight modes that you would like to use. Besides SHOW mode we recommend to have LOITER, RTL and LAND available at all times through your remote controller in case you need them.
- Check GPS
-
Take your drone outdoors (but still in wifi range) and wait for the GPS fix. You should then see the GPS coordinates of the drone dispalyed in the status line.

- Check RTK
-
If your RTK base station is running, use the RTK status tool in the Toolbox widget in the upper right corner of the main window (
 ) to select the RTK source and check the status of the correction data, including the estimated stream rates of the messages. The UAVs panel list view indicates RTK or RTK+ if the receiver on the drone has entered RTK float or RTK fixed mode, respectively.

- Check status and light module
-
Observe the LED lights of your drone. While it is performing prearm checks, the LED lights should blink yellow, once per second. The LED lights should be green if the drone is ready for takeoff. More detailed light status codes are available in the troubleshooting section.
- Check 2-way communication and light module
-
Select the drone in the list and then press the Flash lights button on the toolbar of the UAVs panel.

The LED lights of the drone should flash white, five times. This can be used for a basic LED light test as well as drawing attention to a particular drone on the field when you have multiple drones laid out in front of you.
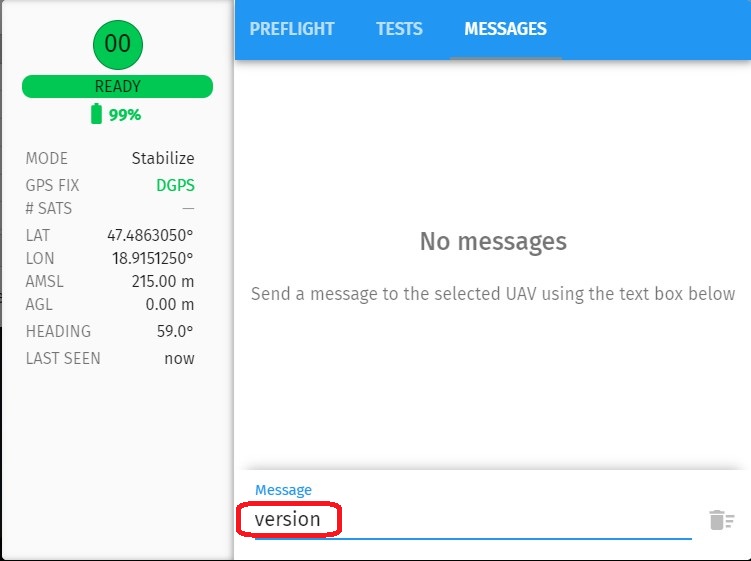
- Check 2-way communication
-
Select the drone in the list, press the Properties button on the toolbar.

Go to the Messages tab. Type e.g. version to retrieve the autopilot version number, or param SERVO11_FUNCTION to retrieve the value of the SERVO11_FUNCTION parameter from the drone.
- Perform detailed LED tests
-
Use the LED test function in the Tests tab in the Properties dialog to perform color tests on your light module.
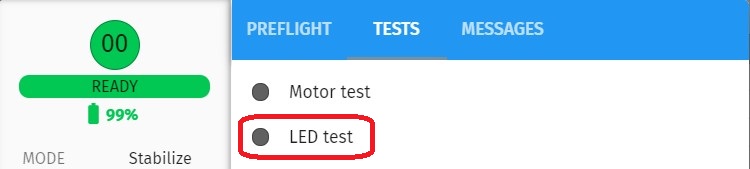
The color should change in red → green → blue → yellow → cyan → magenta → white order.
- Perform individual motor tests
-
Use the Motor test function in the Tests tab in the Properties dialog to perform individual motor tests on a single drone.
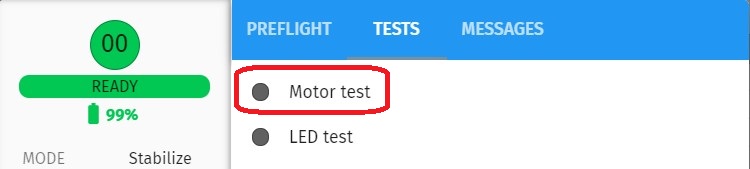
We strongly advise you to detach the propellers before attempting to start the motors the first time.
- Turn on motors
-
Try starting all the motors of your drones. Select the drone in the UAV list, ensure that the status light is green and shows "READY" instead of "PREARM", and then click on the Arm icon on the toolbar. This should start the motors at low rate if all the prearm checks have passed. You can turn the motors off by clicking on the Disarm icon on the toolbar afterwards. If the motors did not start for any reason, this is probably due to some additional safety feature on your drone that does not belong to the regular prearm check framework of ArduCopter. You can still confirm that the command has reached your drone; if you see a red error message at the top of the Skybrush Live window informing you that the command execution has failed, this is an indication that the command was sent successfully because this message appears if we received an error response from the drone in response to the command sent.
- Perform the first flight test
-
Try to fly with a single drone. Get ready with your remote controller. Put your drone in a conveninent flight mode you are already familiar with and that allows takeoff from the GCS, and press the Takeoff button in Skybrush Live. Fly with caution, get familiar with the different information panels of Skybrush Live during flight. Try the "Return to home" and "Land" buttons as well during flight. Try "Halt" only if you don’t mind that your drone will fall down from the sky immediately (use a net or be at very low altitude above ground to avoid crashes if you ever try this mid air).
- Thoroughly check your entire swarm
-
Turn on all your drones and observe the UAVs panel carefully to find any individual errors. Use the Status widget on the top of the main screen (
 ) to get a summarized briefing of any possible individual failures. Get to a state when all your drones are green, indicating that the swarm is ready for takeoff. We also recommend to do a minimal individual flight test with each of your drone before you go for your first swarming flight.
 - Perform the first swarm flight test
-
Put out your drones on an open field with enough space between them depending on your positioning error (3 m with RTK, 5-7 m without RTK recommended). Rotate them to have the same heading more or less, in case you need to manually control more of them at the same time. Put your remote controller in LOITER mode. Select all your drones in the UAVs list and press the Takeoff button. All your drones should takeoff to around 1 m and start loitering on their own. Press the Land button or change to LAND mode on the remote controller to land all the drones.
We are all set. If you are happy with your system, go for the next tutorial to learn how to start a drone show in ten steps with Skybrush Live.